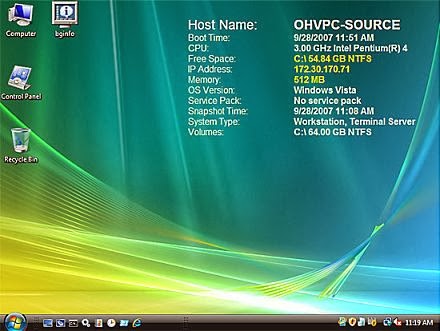
Display a Desktop Wallpaper in the Remote Desktop Session Computer with out configuring in Client RDP settings
We can able to display desktop wallpaper and other system information in remote desktop computers with out configuring Remote Desktop setting in client side computer.(checking Desktop wallpaper option in Experience tab)
For windows server 2000 and 2003
We can able to display desktop wallpaper and other system information in remote desktop computers with out configuring Remote Desktop setting in client side computer.(checking Desktop wallpaper option in Experience tab)
Some time we can not able to configure Remote desktop settings in client computers because of distance issue or new users, for this we can use BgInfo to display wallpaper or system information like server description, host name, ip address etc in Remote Desktop
You can automatically displays relevant information about a Windows computer on the desktop's background, such as the computer name, IP address, service pack version, and more. You can edit any field as well as the font and background colors, and can place it in your startup folder so that it runs every boot, or even configure it to display as the background for the logon screen.
.jpg)
Step 1: Download Bginfo from below link
http://technet.microsoft.com/en-in/sysinternals/bb897557.aspx
Step 2: Extract Bginfo and fallow below steps
- Put bginfo.exe into %windir%.
- Right click bginfo.exe
- Click Properties
- Click Security
- Click Add
- Click Authenticated Users
- Click Add
- Click OK
- Click "Allow" for "Full Control"
- Click OK
Step 3:
- Launch bginfo.exe
- Click "Time remaining" in the top right corner to stop the countdown timer
- Configure items as desired
Desktop: Configure Desktop Background.
If you want separate wallpaper select user these settings and select wall paper, position, background color..etc
Position : Select position as you required.
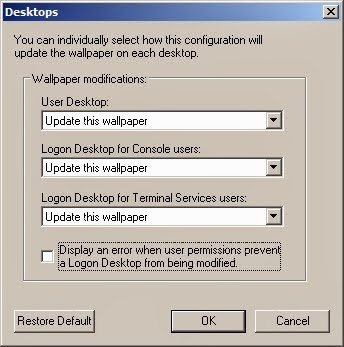
Desktop: Select update this wallpaper in all three drop down, as shown below.
- Click File > Save as
- Save file as bginfo.bgi in %windir%. Do not close bginfo.exe yet.
Step 4:
- Create the directory %windir%\bginfo and grant Authenticated Users read/write access as described in Part 1, steps 3 through 8.
- In bginfo.exe, click Bitmap > Location > Other directory
- Type %windir%\bginfo\bginfo.bmp
- Click OK twice
Step 5:
- In Windows Explorer, navigate to: Documents and Settings\All Users\Start Menu\Programs\Startup
- Click File > New > Shortcut
- Type %windir%\bginfo.exe /timer:0 /i%windir%\bginfo.bgi into the box
- Click Next, then Finish.
Create logon script or schedule a logon task in task scheduler or Scheduled task.
Find below the steps for windows server 2003
Go to control panel - scheduled task
Click on Add scheduled task
Click next
Click browse and go to Documents and Settings\All Users\Start Menu\Programs\Startup and select the Bginfo.exe
And select when log onClick next two times if ask password give password it not necessary to give password.
Then go to scheduled task properties and in Run option paste below link.
C:\WINDOWS\Bginfo.exe /timer:0 /i%windir%\bginfo.bgi
then click ok
Note : You need to log off the system form client Remote session PC after compltion of task... with out log off it wont work
For Windows server 2008
Download the Bginfo application from Microsoft tech net
http://technet.microsoft.com/en-in/sysinternals/bb897557.aspx
Befor downloading create bginfo folder in C drive.
Download the application and extract into C:\bginfo\
Then run the bginfo application and
Click "Time remaining" in the top right corner to stop the countdown timer
Configure items as desired
Desktop: Configure Desktop Background.
If you want separate wallpaper select user these settings and select wall paper, position, background color..etc
Position : Select position as you required.
Desktop: Select update this wallpaper in all three drop down, as shown below.

Click bitmap aption in bginfo application and select location and save the image in
users temporary folder directory
Click File in bginfo application and Save as and save the configuration file into C:/bginfo/ as bginfo.bgi file.
Open notepad and paste below script in the notepad and save the notepad as an bginfo.bat file
c:\bginfo\bginfo.exe c:\bginfo\bginfo.bgi /TIMER:0
And paste bginfo.bat file in below startup location
C:\ProgramData\Microsoft\Windows\Start Menu\Programs\Startup

No comments:
Post a Comment